Monday 27 January 2020

Colour Blending with Heat Transfer Paints

Colour Blending with Heat Transfer Paints


Hi guys long time no post...i've been playing with my heat transfer paints...blending the colours to create a cornucopia of new colours to play with...I will warn you, this is an addictive project. Anyway listed below are the recipes i'm happy with so far.

if you are new to heat transfer paints you can get small bottles from Hochanda and if you are looking for more colours and larger bottle check out the Colourist website.

These are not listed in any kind of colour order...simply in the order i found them..have a play and let me know if you find any new colours..i'm still hunting..its fun.

Wine

1 part Red : 1 part Violet

Sunrise Orange

1 part Hot Pink : 1 part Flavine

Blackberry

1 part Royal : 1 part Burgandy

Mustard

1 part Lilac : 1 part Yellow

Forest Green

1 part Royal : 1 part Sage

Olive

1 part Lilac : 1 part Green

Coffee

1 part Lilac : 1 part Brown

Oak

1 part Lime : 1 part Amethyst

Deep Space

2 parts Royal : 2 parts Navy : 1 part Black

Mauve

1 part Violet : 2 parts Hot Pink

Midnight

2 parts Royal : 2 parts Navy : 1 part Slate

Sunshine

1 part Yellow : 1 part Flavine

Moss

2 parts Hot Pink : 2 parts Lilac : 1 part Flavine

Jade

3 parts Aqua : 1 part Green

Apple

1 part Aqua : 1 part Yellow

Toffee

1 Part Cherry : 1 part Green : 3 parts Yellow

Raspberry

1 part Tan : 1 part Burgandy

Rusty Red

1 part Orange : 1 part Violet

Deep Lavender

1 part Aqua : 1 part Cranberry

Chocolate

1 part Brown : 1 part Magenta

Hookers Green

1 part Mandarin : 1 part Ultramarine

Plum

1 part Cranberry : 1 part Black

Citrus

2 parts Lime : 2 parts Flavine : 1 part Yellow

Spring

2 parts Green : 2 parts Yellow : 1 part Flavine

These are the colours i have found so far...and i'm still playing

While im here a quick work about cleaning wipes. Yes i do use them, i favour the ones that have no holes or patterns pressed into them and use then to clean up my excess paints. Then i dry them out naturally...you get some stunning patterns on them and once they have been pressed several times, they retain enough colour to be used in their own right as panels on journal covers or to make flowers etc.  No waste just lost of fun.

Saturday 4 May 2019

Suncokret Thread Storage


Suncokret Threads


Suncokret threads are a gorgeous silky thick thread that comes to you in a twist that will explode the minute you carefully remove your first length to stitch with. 

There are several solutions to this. You could choose to use the charming animal bobbins from Craft Yourself Silly or you could plait them as i show below. 

interested? check out the Craft yourself Silly Site or Hochanda for the threads and below for the plait.

How To


Begin by pushing the paper seal to loop end of your Suncokret twist, leaving the the other end of the twist (the ends) free to work on.


Carefully cut the threads to create and end of ends


I recommend that you have a second person hold the loop end of the twist while you plait it loosely.


The best thing to use to secure the plait is a hair tie, they are elasticated but covered in a thread so they 'stick' to the Suncokret and don't slide off...I don't recommend an elastic band as they can damage the threads. Don't twist the tie too tightly just enough that it wont move when you give it a gentle tug.


Store Flat.

To remove a thread, choose a loop at the top of the plait and gently pull it loose, straightening the plait as you go to move the ends up the plait..Do not be tempted to rush this as the first few will need some teasing to release from the plait..Gentle tugs and straightening will give you a nice length of thread to stitch with.

Happy Sewing and i hope this helps with your Suncokret Storage.

Friday 26 April 2019

Stitchonary No 7: Woven Stitch

Craft YourSelf Silly Stitchonaries

No 7. Woven Stitch


Stitchonaries are the modern day sampler, they're great for both beginners to learn with and for experienced embroiderers to practice on...and if i'm honest I've been embroidering for nearly 40 years now and they've featured stitches i didn't know and have enjoyed learning. there are 6 project pages as well as the front cover and a patterned back that you can embellish as you choose. They come as a complete panel and instructions on how to fold it into a floppy book, I've then taken that a step further and inserted card to stiffen the pages.
I would also recommend you invest in a heat erasable pen so you can draw any changes onto the page, stitch them and then iron away your lines. The Stranded Cotton used in these projects are from Marathon threads and available in a gorgeous range of colours at a very reasonable price...a great way to start building your embroidery stash.

In these Blogs i will take you through the stitchonaries one at a time and page by page to tell you what i have done and why. But i cant recommend them highly enough and they look awesome when finished too.

interested? check out the Craft yourself Silly Site or Hochanda.

No 7. Woven Stitch

Woven stitches are fantastic fillers and ways to add texture, and they're fun. As always this stitchonary will make a great reference manual for future use.
I went to town on my little goldfish as you can see and gave him some shiny water to swim in courtesy of the Cosmic Shimmer fabric paints.


I always take the time to neatly stitch in the text as it looks very effective, this can be done at any stage of the project and like any page you don't have to complete it in one go...although each page/project is small enough that there isn't really time to get bored or stressed and they look awesome when done.


Oval stitch, a basic way to weave a set of flowers....i've used my inktense pencils to ground the flowers and colour the sky and stem stitch for the stems...i've mixed threads to create different colour blends.

This is a great page for trying out different thread thicknesses, thread types, weave angles and combinations....Have fun and create a great reference page.


Bees, each one is woven slightly differently using the different weaves practiced on the previous page, the honeycombs are coloured with a combination of inktense pencils and Cosmic Shimmer Fabric Paints


Picot stitch was one of those stitches i avoided for years as it seemed more complicated than it actually is, i had great fun playing on this page and coloured the bird with Cosmic Shimmer Fabric Paints.


Another new stitch for me, but i had alot of fun playing with it as you can see. 


Again i played with this one, a little light background colour and a woven leaf completed the apple and of course, as always ive labelled my stitches so i can refer back to them.


The back page is a great opportunity to play with the stitches learnt throughout the stitchonary.  I went a little crazy with this one but had so much fun doing it.

Next up is No 8. Cut Work

Thursday 25 April 2019

Stitchonary No 6. Feather Stitch

Craft YourSelf Silly Stitchonaries

No 6. Feather Stitch


Stitchonaries are the modern day sampler, they're great for both beginners to learn with and for experienced embroiderers to practice on...and if i'm honest I've been embroidering for nearly 40 years now and they've featured stitches i didn't know and have enjoyed learning. there are 6 project pages as well as the front cover and a patterned back that you can embellish as you choose. They come as a complete panel and instructions on how to fold it into a floppy book, I've then taken that a step further and inserted card to stiffen the pages.
I would also recommend you invest in a heat erasable pen so you can draw any changes onto the page, stitch them and then iron away your lines. The Stranded Cotton used in these projects are from Marathon threads and available in a gorgeous range of colours at a very reasonable price...a great way to start building your embroidery stash.

In these Blogs i will take you through the stitchonaries one at a time and page by page to tell you what i have done and why. But i cant recommend them highly enough and they look awesome when finished too.

interested? check out the Craft yourself Silly Site or Hochanda.

No 6. Feather Stitch

Feather stitch is a fantastic stitch for working floral images ir trees etc. and along with the other stitches to learn in this stitchonary, its fun to play with as well. This stitchonary is the beginning of expanding your embroidery reportoire and as you can see from the cover of this one, i got a little carried away i was having so much fun.


I always take the time to neatly stitch in the text as it looks very effective, this can be done at any stage of the project and like any page you don't have to complete it in one go...although each page/project is small enough that there isn't really time to get bored or stressed and they look awesome when done.


Feather stitch practice, try different lengths of stitch and angles, play and get comfortable.


This is a great page for practicing turning corners and stitching in the round.....on your page you will see you only have 2 ovals, I've added a third to mine to see how it looks worked in a tight area. 


Fly stitch tree, and a little background colour added with inktense pencils.


Weirdly i struggled a little with quill stitch, as you can see, it was a new stitch to me and one i am resolved to practice more as its a fun variation.


Cretan stitch with different numbers of strands on the needle to see the effect the thicknesses had on the peice. One of my favourites i think


Again i played with thread thicknesses and i used my heat erasable pens to mark guidelines to stitch too so it looks neat. note that i have listed thread thicknesses where necessary on each page.


The back page is a great opportunity to play with the stitches learnt throughout the stitchonary. I have added extra colour with Cosmic Shimmer fabric paints.

Next up is No 7. Woven Stitch

Friday 5 April 2019

Naughty Needlework NoteBook Cover


NAUGHTY NEEDLEWORK 

NOTEBOOK COVER


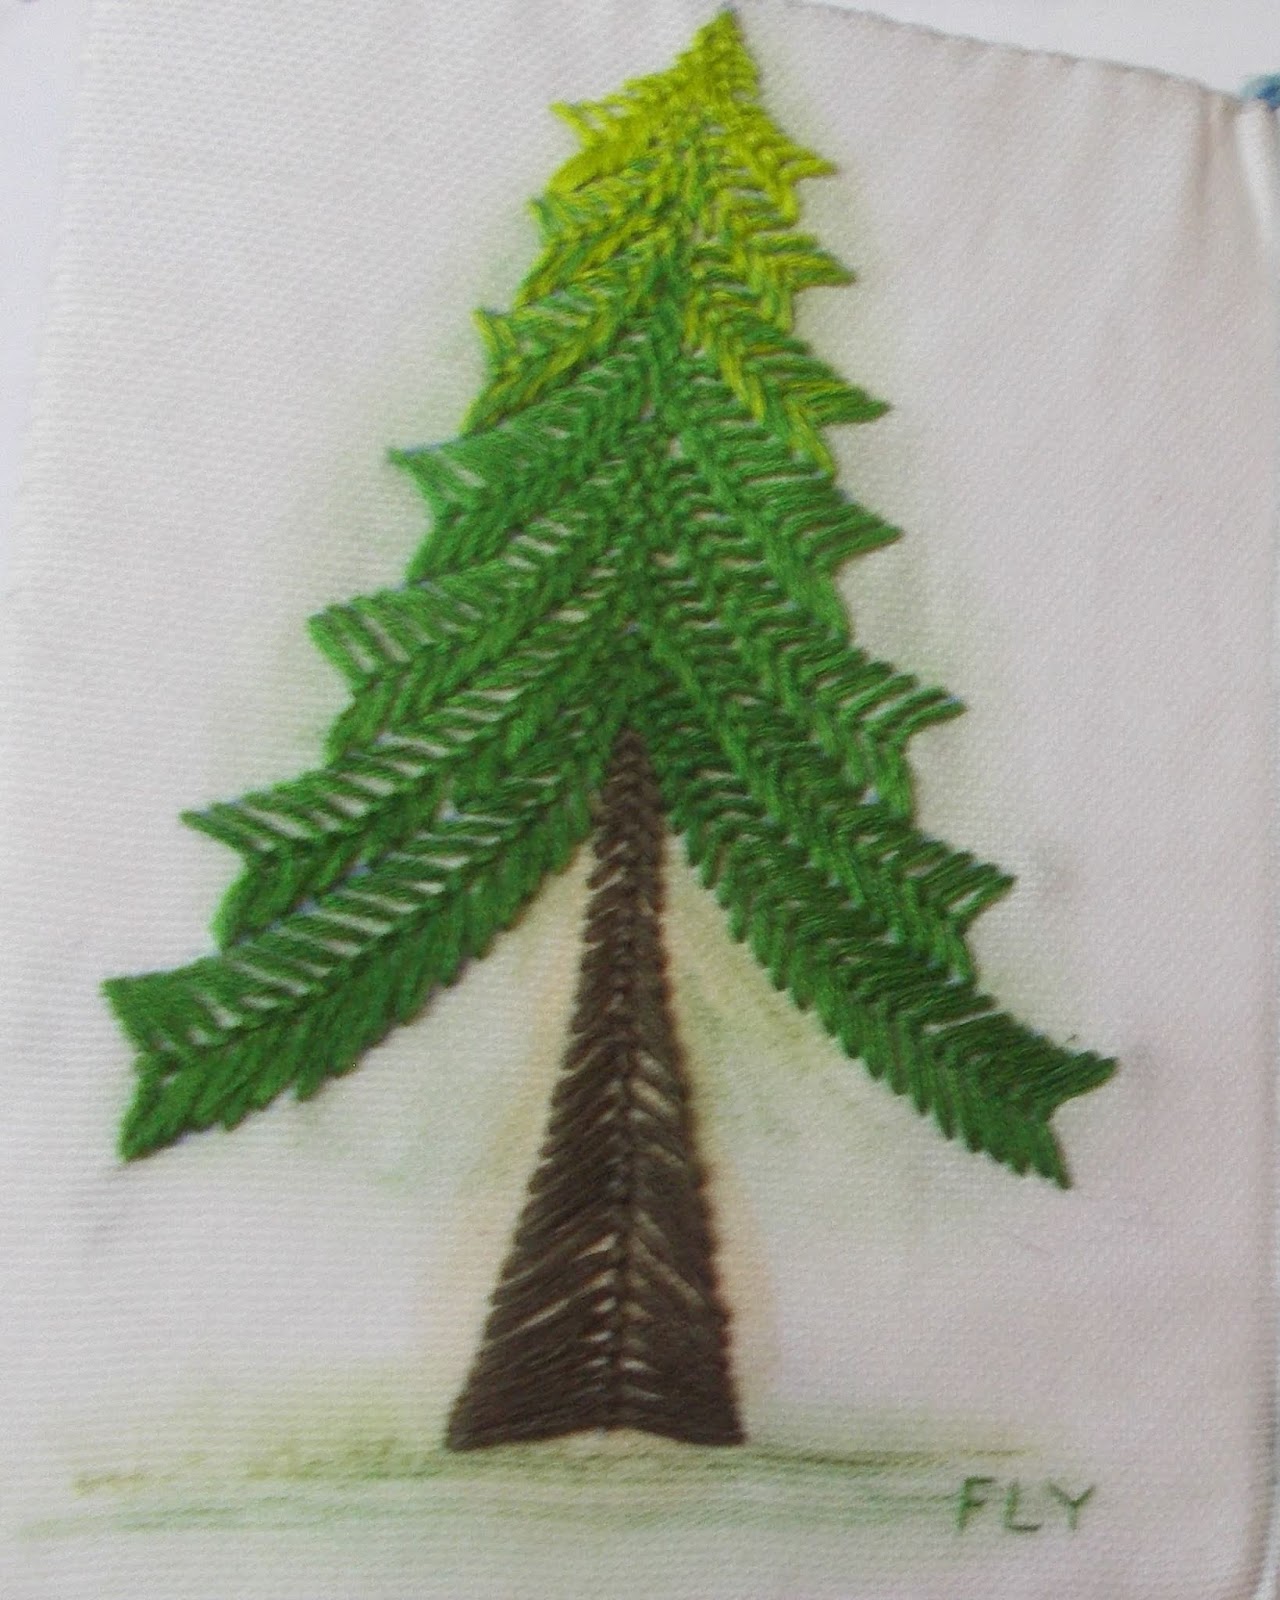
While i was unpacking a few crafty boxes yesterday (we've moved) i came across this nearly finished Naughty Needlework and decided to finish it.


As i was working on the final stitches i decided that i didn't want it to be stuffed in a hoop and hung on the wall, i'd bought the piece for my own amusement and i wanted it somewhere i would see it. One of my project books needed a nicer cover and that was that.
I know i am in the middle of blogging the awesome stitchonaries but i couldn't resist showing you how to make this books cover as its easy to do and satisfying.

Ingredients

6 x sheets of A4 Card
An A4 Notebook
Temporary Adhesive for fabric or pins
Craft Yourself Silly's Floral Panel for cover
Naughty Needlework of choice...completed
Sewing Machine
Marathon Rayon Variegated thread
Supersoft Batting With Scrim
Ruler
Pencil
PVA
Heat Erasable pen

How To:


On two of the pieces of A4 Card measure 2cm along the long edge and cut off....these will for your spine and iff the book you have chosen to cover requires a wider spine you can simply measure to fit you book, the same if you require a smaller spine. Put the Spine Strips to one side.


Fold the remaining piece of card in half along the long edge and cut along the fold...these are for your inner flaps.


Take one of the remaining A4 sheets of card and use a small amount of adhesive to fix it to the batting...allow a 5mm edge if you are lining it up against edges. Cut all the way round with a 5mm overlap of batting.


Use the cut piece to measure out a second piece of batting, this will be for the cover...put to one side for the moment and repeat the process with one of the spine strips.


Use the A4 card on the back of your selected background fabric and draw round it 4 times with your heat erasable pen....if it is patterned remember to allow for pattern direction etc. and leave approx an inch between each piece.
Repeat this twice with the spine strip and four times with the inner flap card.


Measure and mark a 5mm edge round each piece and carefully cut the pieces out on the outer marks.


With a little bit of the temporary adhesive stick one of the a4 pieces over the batting covered A4 Card. Do the Same with all the other pieces except the one for the book cover...out this to one side.


Take the piece of Batting covered card and a piece with no batting and line them up together with the fabric facing outwards. Pin down one side.


Open the card up and apply a small amount of PVA to the card so they will stick together...this will add a little strength and rigidity to the finished piece. Pin round the remaining 3 sides to hold them together.


Repeat this with the spine and two inside flaps.

TOP TIP: When using your spray adhesives make sure there is nothing behind the piece you spray...Such as you mobile phone Grrrrr....LOL


Take the spare piece of cut batting and fabric and stick them together...trim your Naughty Needle work to the required size and pin into the desired position. I have used one of the off-cuts from the embroidery to create a title strip.


Stitch round the pinned piece of fabric with a simple running stitch...I went round each piece 3 times and deliberately made the stitching a little wonky.


My machine is basic but can do a simple text..so I've added my title.


Using running stitch, stitch round the pinned edges of all pieces to secure them together and remove the pins.


Go over the stitched edges with a tight zig-zag...sewing it so that on the left the needle is in the fabric and on the right of the zig-zag, the needle is free of the fabric.


For the edges of the inner flaps that will point towards the spine when the are fixed inside the cover i have run over the zig-zag a second time.


Place the back cover of the book and spine side by side under your foot...set the widest zig-zag you can...mine was a 6, and stitching so that on the left the needle falls on the cover and the right it is on the spine. Sew the length of the pieces to fix them together. Making sure the  front is lined up correctly...repeat with the front cover.

TOP TIP: make sure you have stitched right to the edges of the two pieces as it can become a bit ragged if not secured well, if you are unsure....stitch it twice.


Lay the inner flap against the inside of the cover (on the outer edge as in the above picture. Zig-Zag all the way round the the outer edges of the book cover, securing the second flap to the back cover on the way. I went round a second time in the opposite direction to catch any stray thread that had escaped the 1st stitching. Insert your book.


Fray the edges of the Naughty Needlework and Header...Looks nice like that...no other reason. 


If like me you are totally rubbish at turning corners, use some cheap metal corner protectors to hide the mess and protect the edges.


Keep the scraps of fabric...if nothing else they can be used in Powertex projects.


Keep the threads there are a lot of uses for these scraps...I keep mine in a jar and when the jar is full sort them into colour coded jars.


So there it is, a different way of using your Naughty Needlework and how to make a simple book cover all in one...If you are new to machine stitching i cant recommend the Running Stitch and Zig Zag stitch machine embroidery stitchonaries highly enough. By the time your finished those this project will seem easy.